Days 1-3: Solid Models


Day 4:
The true number of man-hours Alex spent on the solid model is unknown, but Saturday, August 21st is when all the action started. We hardly had to lift a finger (literally). With a little help from modern technology, we pressed the "print" button and the helmet started taking shape. To make the complex shape of the helmet, we are using an FDM printer. FDM (or fused deposition modeling) is a process where melted plastic (polycarbonate in this case) is fed through a print head and stacked up layer by layer to make real 3D parts out of plastic. Over 24 hours is required to print one half alone, but the results were very impressive.
Day 5:
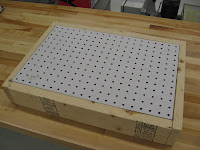
Sunday. As the printer continued to do its thing, there were plenty of other items to take care of. Danny got to work making a vacuum former for the visor. The base is a couple of 2x4's and some perf-board from Home Depot. We had planned to make a mold for the visor out of 3/4" MDF layers stacked and glued together. The whole block would then be CNC milled to shape. We blindly started milling the block on a ProtoTrak CNC bridgeport-style mill. After making a large mess of sawdust, we found out we didn't have enough Z-travel to make the entire mold without pulling some tricks in CAM software. The results were good, but we needed a better solution.

Day 6:
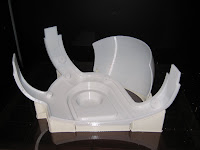
Monday. The left half of the helmet is finished printing, along with the backer plate for the hair. The printer adds support material under overhangs or empty spaces, and the support is broken off by hand. Here you you can see Danny test fitting the helmet half with some support remaining in the ear area.

Day 7:
Tuesday. Work continued on the side tasks, primarily finishing some design details with the plastic frames to hold the LEDs and the PCB design. In the interest of time, we decided to make the PCBs using the dreaded ExpressPCB software. While the software is a little outdated and clunky, they do get the job done fast and cheap. Danny also got to ordering the materials for the visor and LED covers. Below is the final layout for the PCB.

Day 8
Wednesday. Danny and Alex come up with a new plan for the visor mold, involving a much bigger CNC mill. Below is a picture of Alex and his CNC (taken during another project), along with pictures (and video!) of the visor mold being machined. First a roughing pass was made with a 1" endmill taking 1" steps. Then another roughing pass was made with an extra-long 1/2" ball endmill and then a finishing pass.


The result is a work of art (and a giant mess). You can even see the indentation that Alex left in the solid model so we would know where the visor needed to be cut after the sheet of plastic is formed over it.


Day 9
Thursday. Work continues. The PCB design was finalized and order was placed with rush delivery so we could have them over the weekend. Coats of primer were added to the mold, along with more sanding to get the smoothest finish possible.


That brings us up to where we stand today. Still lots of work ahead. I've learned that writing a blog takes a lot of time too! Hopefully I can make regular posts with progress. For tonight, it's time for me to move on to my other projects!
There has been more progress on this project: See Part 2 Here.