Days 1-3: Solid Models

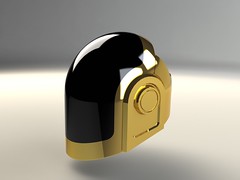
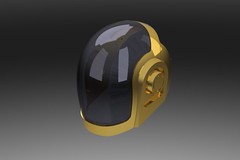
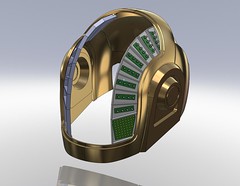
Day 4:
The true number of man-hours Alex spent on the solid model is unknown, but Saturday, August 21st is when all the action started. We hardly had to lift a finger (literally). With a little help from modern technology, we pressed the "print" button and the helmet started taking shape. To make the complex shape of the helmet, we are using an FDM printer. FDM (or fused deposition modeling) is a process where melted plastic (polycarbonate in this case) is fed through a print head and stacked up layer by layer to make real 3D parts out of plastic. Over 24 hours is required to print one half alone, but the results were very impressive.
Day 5:
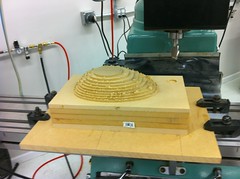
Sunday. As the printer continued to do its thing, there were plenty of other items to take care of. Danny got to work making a vacuum former for the visor. The base is a couple of 2x4's and some perf-board from Home Depot. We had planned to make a mold for the visor out of 3/4" MDF layers stacked and glued together. The whole block would then be CNC milled to shape. We blindly started milling the block on a ProtoTrak CNC bridgeport-style mill. After making a large mess of sawdust, we found out we didn't have enough Z-travel to make the entire mold without pulling some tricks in CAM software. The results were good, but we needed a better solution.
Day 6:
Monday. The left half of the helmet is finished printing, along with the backer plate for the hair. The printer adds support material under overhangs or empty spaces, and the support is broken off by hand. Here you you can see Danny test fitting the helmet half with some support remaining in the ear area.
Day 7:
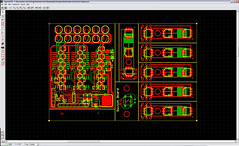
Tuesday. Work continued on the side tasks, primarily finishing some design details with the plastic frames to hold the LEDs and the PCB design. In the interest of time, we decided to make the PCBs using the dreaded ExpressPCB software. While the software is a little outdated and clunky, they do get the job done fast and cheap. Danny also got to ordering the materials for the visor and LED covers. Below is the final layout for the PCB.
Day 8
Wednesday. Danny and Alex come up with a new plan for the visor mold, involving a much bigger CNC mill. Below is a picture of Alex and his CNC (taken during another project), along with pictures (and video!) of the visor mold being machined. First a roughing pass was made with a 1" endmill taking 1" steps. Then another roughing pass was made with an extra-long 1/2" ball endmill and then a finishing pass.
The result is a work of art (and a giant mess). You can even see the indentation that Alex left in the solid model so we would know where the visor needed to be cut after the sheet of plastic is formed over it.
Day 9
Thursday. Work continues. The PCB design was finalized and order was placed with rush delivery so we could have them over the weekend. Coats of primer were added to the mold, along with more sanding to get the smoothest finish possible.
That brings us up to where we stand today. Still lots of work ahead. I've learned that writing a blog takes a lot of time too! Hopefully I can make regular posts with progress. For tonight, it's time for me to move on to my other projects!
There has been more progress on this project: See Part 2 Here.


Wicked
ReplyDeleteThat helmet is siiiiick! Do you guys think you are going to attempt to make the Thomas Bangalter helmet? Also, would you guys consider making another? I'd pay handsomely :)
ReplyDeleteThanks! Currently we have no plans to make the Thomas helmet, but it's not out of the question. We didn't really design this for production, but I'm sure if the price was right we could make another.
ReplyDeleteHow much would it cost to sell an unpainted, lightless, untinted helmet?
ReplyDeleteWould it be possible for you to send me the solidworks files? I'd like to attempt a helmet myself and that would save me a lot of time :P
ReplyDeleteI would love to offer a price for the Thomas Bangalter Helmet please email me!!!!!!
ReplyDeleteHello Marc
ReplyDeleteI am currently in the process of making a daft punk helmet, after seeing your and volpin's amazing reproductions. I was wondering if it would be possible to send me the 3D rendering you made so I can start the CNC milling. Since I do have access to a mill I thought about making the entire helmet from lateral sections of milled wood, then combine them to make the whole model.
Here is my email address cam_mag@hotmail.com
Hope to hear from you in either case, love your work
Cam
Would it be possible for you to send me the solidworks files?
ReplyDeletemy email : Moustik7402@gmail.com
If anyone has recieved these files, could they by chance send them to me? I am a high school student who would like to make this for his senior project.
ReplyDeleteI'm also gonna attempt to make a helmet,i found a 3d printer company nearby,is it possible that you send me the models you used for printing? I'd be grateful :)
ReplyDeleteemail: aykut.b@gmail.com
This comment has been removed by the author.
ReplyDeleteME TOO! could you please send me the models? maximebreton@live.fr
ReplyDeletethanks by advance!
I would really love to have one of these built in time for my senior prom, could I possibly get the models?
ReplyDeleteStaccatoForte@gmail.com
Thanks a bunch!
This comment has been removed by the author.
ReplyDeleteGolf cart lift kits are ways to add many height together with improved suspension in your existing the game of golf cart. There are various different companies and varieties of golf cart lift kits. In order to ascertain which golfing cart lift kit is befitting your model of golf cart, you must locate some kind of chart or perhaps tool in which lists models of golf carts plus the golf wagon lift kits which have been compatible having each product.
ReplyDeleteAnd me! Share! Could you please send me the models? marco.atjr@gmail.com
ReplyDeleteCongratulations, this is a harder better work...
Nice work Marc!!It is possible that you send me the CAD models of the helmet?
ReplyDeleteI'd be grateful :)
email: voltekmanija@gmail.com
thanks and have a nice day
How much does it cost to fabricate the fdm parts?
ReplyDeletecould i possibly get the digital design? i would like to do what you did and rent a 3D printer to create my own, but im not a tech person and dont know how to digitaly create one. id also love to know were you got the printer from. is it yours? can i barrow it? i would pay. thank you!
ReplyDeletealso i'd like to possibly buy a visor from you if you still have the materials, or at least the form you used. thanks again
ReplyDeleteIf you still want a machine, I have available everything to get it printed for about $1000 USD+ shipping in one piece
DeleteIf you still want a machine, I have available everything to get it printed for about $1000 USD+ shipping in one piece
ReplyDeleteI wonder if you could provide the format for printing 3D helmet
ReplyDeletequisiera saber si podria facilitar el formato del casco para imprimirlo en 3D, soy de venezuela este es mi correo fajardo_4@hotmail.com
ReplyDeleteHello, as a fellow Daft Punkian, I have been aspiring to build a Guy helmet for almost three years now. Your instructions throughout the process are some of the most detailed and helpful that I have found. As a local opportunity has just sprung up with a 3D printer, I was wondering if it was possible for you to send me the printable 3D files for my own project. Thank you so much for all your help.
ReplyDeleteP.S.- I posted a comment before but it seems that it didn't work out correctly. Sorry if it posts twice :).
Hello, love the work you guys have done for the Guy Manuel helmet! I was wondering if someone could give me the solid works file? I would be forever grateful! And as always keep up the awesome ideas!! :)
ReplyDeleteEmail: nickthejack180@hotmail.com
I definitely enjoying every little bit of it. It is a great website and nice share. I want to thank you. Good job! You guys do a great blog, and have some great contents. Keep up the good work. There are so many fun and exciting Things to do and experience around the world that I thought I'd put together a list of my favourite things to do for all travelers ...
ReplyDelete